Posts

Power Pages Manifest Explained related to Collaborative Development and ALM

In the Microsoft Power Pages, understanding the nuances of configuration files like the `manifest.yml` and environment-specific manifests (e.g., `dev.crm4.dynamics.com-manifest.yml`) is crucial. These files play a significant role in managing and deploying Power Pages sites, particularly in collaborative and ALM contexts. Understanding the Manifest.yml File First of all, always refer to the official documentation on how the power platform cli tool is supported. Creation and Usage Creation : The manifest.yml is generated through the pac powerpages download command. It serves as a snapshot of the Power Pages site's configuration, capturing details like page templates, form settings, and access permissions. Example: When you run this command, it creates a manifest.yml file that includes details of all the components such as web forms, entity lists, and site settings configured in the Power Pages site. Usage : The pac powerpages upload command utilizes the manifest.yml file to updat...

Filtering Dropdown choices in a Power Pages form using Dataverse Relations

Image
Filter dropdowns Dropdown filters are a useful feature in form design, allowing users to filter options in one dropdown based on other selections in the form. In Power pages, leveraging the capabilities of Dataverse relations makes it possible to create these powerful filtering mechanisms. This is how it works. What you need to know first. Before we dive into the implementation details, ensure that you have a basic understanding of Power Pages forms and Dataverse relations.  How is´t made Create two tables in your Dataverse environment: "Type" and "Category." These tables will hold the relevant data for the dropdowns. Establish a Lookup Relationship between the "Category" and "Type" tables. Create a lookup column in the "Category" table that references the "Type" table. This lookup column will allow us to filter the categories based on the selected type. Now, create a third table called "Request." This table will ser...

Exploring the Power of Variables in Liquid and Power Pages

Covering the basics - Variables As a templating language, Liquid offers a rich collection of possibilities for web developers and designers, bringing Dynamics business data to the web. Variables in Liquid enable us to display dynamic content and enable us to implement a certain level of custom logic as well. We'll have a look at some examples on how to work with variables. Variable Assignment In Liquid, variables can be assigned values using the {% assign %} tag. For example, let's assign the value "Hello, Nerd!" to the variable greeting: {% assign greeting = 'Hello, Nerd!' %} Variable Output Once a variable is assigned a value, it can be outputted using the {{ }} syntax. To display the value of greeting, we can use: {{ greeting }} Assigning Site Settings Liquid is powerfull enough to allow you to assign values from site settings to variables. For example, if you need the site setting for inactivity for ...

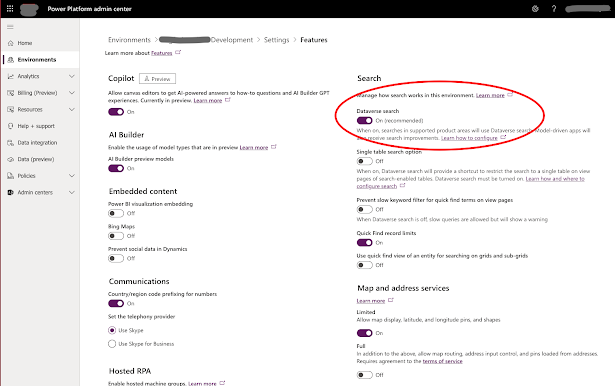
Enabled Dataverse search in the Microsoft Dataverse environment

Image
Search is a very powerfull feature when properly configured. Here is a quick step through on how to implement search in Power Pages. Enable Search in the environment Go to the Power Platform Admin Center.  Open the administration settings for the Microsoft Dataverse environment and navigate to the search or options settings.  Enable "Dataverse Search." This needs to be done once for each environment. Enabled Dataverse search in Power Pages  Go to Portal Management for the Power Pages site and click on Site Settings.  Filter the settings for search.  Make sure that EnableAdditionalEntities, Enabled, and EnableDataverseSearch are set to "true."  Ensure that the table to be included in the search is included in the filters.  Note that tables are listed with the category first, followed by the column and table name. If multiple tables fall under the same category, they should be separated by a comma. Categories with tables are separated by a semicolon. Thi...

Revitalizing My Developer Blog: Power Pages for Modern Web Development

Welcome back! It has been quite a while since my last blog post on MyCodeStories, but I'm thrilled to announce that I'm finally reviving this blog. As the technology landscape has evolved over the years, so have my interests and areas of expertise. In the next posts, I want to share with you my renewed focus on Power Pages, as well as the exciting opportunities they present for modern web development. Embracing Power Pages Power Pages, powered by the robust capabilities of Power Platform and Microsoft 365, have gained significant traction in recent years. These pages allow developers to create dynamic, data-driven web experiences without diving into complex code. With a rich set of features and easy integration with various data sources, Power Pages enable developers to rapidly build and deploy websites that cater to specific business needs. Power Pages allow external users to access data, perform actions, and collaborate seamlessly. Whether it's customer portals, partner p...

Design an awesome experience! Part four.

Image
Let's get physical Involved in a service of any kind there will be work that not necessarily is very visible. Visualizing progress or work behind the scenes or even giving the user some sort of price or token for using the service creates a more personal relationship or even feeling of ownership to the service. This boosts loyalty and the user is most likely to return time and again. Getting physical would be far easier in a physical world. Now, in this context, the closest we get to getting physical would be by sending the user a price of sorts, but that would be expensive and not least – it would be very slow and taken out of context. What we need is something that would pamper the user and tie the price to the context, so the user experience some sort of reward for being loyal. This is where we can draw advantage from social gaming, rewarding the user with points or badges for their activity. By ranking the users by their activities, or even by their contributions, ...

Design an awesome experience! Part three.

Image
Chunk it up! Designing complex services requires that you fill in all the blanks in the service journey. Dividing the your design into a preface, main face and post face helps you focus on what happens before, during and after the user have interacted with the service. The preface is where the user encounters your service for the first time. You need to ask questions like; how will the user become aware of the service? What parts of the service does the user interface with and how are they presented? Does the service solve the right problems? What is the impression the user is left with after leaving the service and how likely is it that the user will return? Let us assume that we have interviewed our stakeholders. Sally from accounting have a need for registering correct hours before billing the company’s clients. Her need is to get the system implemented as soon as possible and getting the users to hand in their hours using the new system instead of handing it i...

Design an awesome experience! Part two.

Image
Focusing on the user Our design focus when designing a service is the user, and how the service journey will affect the user. Not only must we be able to tell how the service will work and how the user will interact with it. We also need to think about what happens before and after the user has interacted with it, what knowledge is required even to use it, etc. To answer these questions we need to understand the user needs, and how the user will experience the service. The methods used to acquire these answers might vary from interviewing the users, observing the user, or experience the service yourself. The chosen method will differ from time to time. It depends on how complex the service will be. The main point is that you as a designer create a way to communicate with the user and map their wishes, desires, requirements etc. Remember that as little as one extra click or unnecessary text box might make your design quite cumbersome and difficult to use. I would claim tha...

Design an awesome experience! Part one.

Image
The methodology behind designing service journeys provides you with great analytical tools that will fit almost any kind of experience. Working in the areas of design, development and project management this approach have been amongst my favorites for many years, but I’ve never taken the time to really document the way I use it. Years ago, I attended a session demonstrating AT-ONEs Touch-point cards, and how simple images and text can be used to design a service or a service journey. I have kept my stack of cards and used them in every project I have worked on since. The last few years I have dived into different methodologies and dragged more concepts into my work as I saw them fit. Now, time is overdue to tie some threads together and document my work. My next few blog posts are dedicated to this subject, and I hope that they can be helpful. My context is based on designing web and intranet experiences, so naturally I will try to tie up this in my examples. Designing a ...

Folding map effect using Oridomi

Image
Half gob smacked I’ll just throw out one more post today. I’ve discovered Oridomi today. In a matter of minutes, I was able to add a cool feature to my page. First, I added a static Google Map image to my page using the Google Map API for position and markers. var customShapes = []; <img src="https://maps.googleapis.com/maps/api/staticmap?center=59.273544,11.096837&zoom=15&size=600x400&markers=color:blue%7C59.273544,11.096837&maptype=hybrid" /> Then I put this image inside a div element that when executed folds the map up like a… yes, map ;) Check out the code… var customShapes = []; var oriDomi = new OriDomi('.myoridommi', { vPanels: 5, // number of panels when folding left or right (vertically oriented) hPanels: 3, // number of panels when folding top or bottom speed: 3200, // folding duration in ms ripple: 2, // backwards ripple effect when animating shadingIntesity: .5, // lessen th...

Fetching blogger posts using ajax.

Image
For my showcase webpage, I wanted to show some of my blog posts as a demo. Now getting hold of rss-content is fairly easy in an rss-reader; but as JavaScript objects – not so much. I came across different pieces and put them together in a solution that gave me a limited number of blog posts as JavaScript objects using ajax and the blogger API. In the following snippet, I fetch the data using ajax and handle the response building an array of blog posts. Please see my inline comments... var customShapes = []; // First I need a container holding the data in a structured way. As I render the content, I traverse through the array handling each object var blogPosts = []; ... // As the query will change in different scenarios I keep part of the query string as an argument in the function call. loadBlogPostAndRender('alt=json-in-script&start-index=1'); ... ... function loadBlogPostAndRender(posts) { $.ajax({ url: 'http://www.someBloggerBlogUrl/feeds/p...

Execute Canvas rendering based on scroll event.

Image
I have been showing animations using canvas in several blog posts lately and implemented a lot of this in my own homepage. Now, if you are doing animations you need to plan how the animations should execute so that the user does not miss the whole show. :) You might want to kick off the animation on a click, or even on a long page – start the animation once the user scrolls down to the animations position. There would be little use in an animation if the show were over when the user gets to it, right? Now, you can hook on to the browsers events using the window object or the document object. The click event I’ve already covered in this post . For the scroll event you need to grab the window object. The easiest way to do this is to use JQuery and extend the scroll event. In this example I’ve added a delay before kicking of the animation. I’ve also calculated the position the user should scroll to before firing the event handler. var target = $("#mainSectionFootprint...

Resizing your canvas drawings properly using repaint

Image
This post will be a short one attending a problem I briefly touched upon in my previous post on animation using canvas. We live in a "mobile first" world and need to pay attention to responsive designing. Try as you might resizing your canvas using CSS you are in for a disappointing surprise. Especially if you are rendering text, it will look all chunky and broken. My solution to this problem is to calculate a factor value based on the window and canvas width. Using this value, I can multiply it with all xes and ys and lengths and widths and so on and keep the relative positions all these shapes have to each other. var ic = window.innerWidth / (canvas.width * 1.2) > 1 ? 1 : window.innerWidth / (canvas.width * 1.2); When adding objects I apply the factor to keep the relative positions. var customShapes = []; // Figures - Balls customShapes.push({ x: ic * (canvas.width / 2 - 58), minRadius: 0, maxRadius: ic * (3), y: ic * (canvas.height / 4 - 152), borderThic...

Animating objects using HTML5 Canvas

Image
Object animation using JavaScript is fairly simple once you get the hang of it. In the three previous posts I've explained how to render shapes and how to render a series of shapes. To recap some of the steps I've included the part where I create the objects. Creating classes I've created a generic shape class called CShape, with a set of basic properties that I find relevant for any of the shapes I'm going to render. This also includes properties relevant to animation. Each property is explained in the comments below. // Applies to circles, boxes and lines // X and Y coordinates // expand (bool) growing (true) or shrinking (false) // direction - animating going cw or ccw // speed - animation speed // borderThickness - border thickness // borderColor - border color // color - shape color // clickZone - clickable zone with pointer cursor // speed - animation speed function CShape() { this.x = 0; this.y = 0; this.expand = true; this.speed = ...

Rendering shapes in Canvas using objects

Image
In a previous blog post (Painting using Canvas and JS), I explained how to paint a figure using canvas. I explained how to paint the figure inside a single function by setting coordinates and calling stroke and fill. In the following post, (Create an interactive HTML5 Canvas using event handlers.) I presented the clickable area as an object. In this, post I am going to start up by combining the two like the snippet below. I create an object called CustFigure. It has X and Y values and a height and width. This is all we need in order to place it in the grid and to get the size of the figure, say a box. var CustFigure = function (x, y, height, width, label ) { this.x = x; this.y = y; this.height = height; this.width = width; this.label = label; }; function DrawShape(Shape){ var rectWidth = Shape.width; var rectHeight = Shape.height; var rectX = Shape.x; var rectY = Shape.y; renderContext.beginPath(); renderContext.fillRect(r...

Create an interactive HTML5 Canvas using event handlers.

Image
You can use HTML5 Canvas as an alternative approach designing info graphics, branding graphics etc. Using the example in my previous blog post, I will add a clickable area on the canvas and use a JavaScript event handler to execute some logic. This is the result of the previous example. I want to pop an alert Box when clicking inside the logo. I need to create an object reflecting the coordinates I want my clickable zone to have. I’m also throwing in an id/name. var CustFigure = function (x, y, height, width, name ) { this.x = x; this.y = y; this.height = height; this.width = width; this.name = name; }; In this case I just create a global Array that I can pop the objects on to.   var custFigures = []; At some point (I choose to include it in the function drawing  the logo) we create the object with the desired coordinates and push it on to the array. var custFigure = new CustFigure(50, 50, 75+50, 75+50, " Hello ...

Painting using Canvas and JS.

Image
Lately I've been playing around with HTML5 and Canvas trying to render icons and graphics without the use of image files. This blog post is simply showing how to render the HTML5 logo using only code. First up, we create a HTML5 canvas-tag where our logo will live. I’ll add some simple CSS to it for good measure, creating a circular form for our logo. We make sure to call our function rendering the logo as the page is loaded. <canvas id="xpCanvasWeb" class="testblock" width="175" height="175"></canvas> <style type="text/css"> .testblock { background: none repeat scroll 0 0 #2a2a2e; border: 1px solid #2a2a2e; border-radius: 115px; margin: 10px; } </style> Now, for the rendering-function, please see my inline code. My approach towards this is to paint the logo in «layers», starting with the background and adding on layer by layer until the logo is complete. By using semi-transpare...

Using parameters in XSLT

If you've read some of my previous posts, you've seen examples of using parameters when calling templates. I earlier wrote about assigning XML structures to variables. Now we are going to use a variable as parameter for a template call. Create the variable and send it as a parameter to your template of choice: <!-- Given a structure like this one... --> <xsl:variable name="someVariable"> <record> <artist sex="female">Madonna</artist> <title>Like a prair</title> </record> </xsl:variable> <xsl:call-template name="targetTemplate"> <xsl:with-param name="string" select="$someVariable" /> <xsl:with-param name="attributeString" select="$someVariable/@sex"/> </xsl:call-template name="targetTemplate"> </xsl:template> Grab the variable and do something that makes sense. ;...

Set the logo of all sites in a SharePoint 2013 site collection using PowerShell - Flash post

If you want to quickly set the site logo of a complete SharePoint 2013 site collection, enter the following: (get-spsite  http://YourSiteCollectionURL ).AllWebs | foreach {$_.SiteLogoUrl = “/relative/path/to/companylogo.png”; $_.Update()} Thats all :)

Open termbased navigation links in new window in SharePoint 2013

Term based navigation has been greatly improved in SharePoint 2013, but sometimes you want to open navigation URLs in a new window. However, the term store does not offer such a property so we'll solve it using JavaScript instead. In the masterpage element add this script: script language="JavaScript" // Adding an entry to _spBodyOnLoadFunctionNames array so the function runs on pageLoad _spBodyOnLoadFunctionNames.push("rewriteNavigationLinks"); function rewriteNavigationLinks() { // collecting anchors var anchorArray = document.getElementsByTagName("a"); for (var x=0; x 0) { oldUrl = anchorArray[x].outerHTML; // adding target attribute newUrl = oldUrl.replace(/#targetnewwindow/,'" target="_blank'); anchorArray[x].outerHTML = newUrl; } } } /script Then in the term store append "#targetnewwindow" on the link to activate the specific link. E.g. http://intranet.foo/somepagename.aspx?pid=000#...